Beam is the first coin to launch that incorporates a version of the mimblewimble protocol. Their is a lot of information about this protocol but the main points are:
- Increased Privacy
- Scalability, and reduced blockchain size
I suggest everyone who wants to mine this coin, reads our article, since it talks about how they are able to accomplish this, as well as how this differs from Monero and ZCash.
Beam is using the Equihash 150/5 protocol, is written in C++ and is open to allowing ASICS at some point.
You might have heard about Grin, which was the second cryptocurrency to come out with a version of the mimblewimble protocol. Beam is a lot different in architecture of the system, compared to Grin. The main differences from the users perspective is Grin allows for IP, file and address based transactions, while beam uses temporary ID’s that help wallets communicate with each other, and has the ability to create permanent ID’s since regular ID’s change after each connection to a wallet, to increase privacy.
Now that we know the details about Beam, let’s get to mining some BEAM!
Some General Mining Tips
So before we start this tutorial, I have two tips for making the most out of your mining experience. First make sure you have the latest drivers for your GPU’s. Secondly, most mining software will get flagged as a virus from virus scanners. Because of this, if your mining on your normal everyday use or gaming computer that has an antivirus installed, you will want to exclude the mining software from the antivirus. What I like to do, is I make one folder and then put all of my mining software in sub folders. I then exclude the top level folder from the antivirus and that excludes all the mining software.


Wallet Setup
In this tutorial we are also going to show the wallet setup process. The reason were covering a wallet setup in this tutorial is because the mimblewimble protocol coins are designed much differently when compared to the other cryptocurrencies. One of the biggest design differences is there are not suppose to be any addresses in the system, and the wallets communicate (they do not have to be online) with each other to send crypto. Because this is a very different system than everyone in cryptocurrency is used to, Beam has IDs that is how you connect wallets to each other. This feels a lot like the cryptocurrency experience we are used to. Since these addresses are not permanent to increase privacy, for mining we will need to generate an ID and set it to never expire.
There are wallets for Windows, Mac and Linux, as well as wallets with built in miners, and their own mining software. They also have CLI and GUI versions. We are just going to use the windows GUI with only CPU miner in this tutorial, since it has been reported that outside miners can achieve better performance.
Installation is like installing any Windows program. Once downloaded and installed click on create new wallet.

You will want to write down the seed words, since this is your private key for the wallet.

For the options, you probably want to run your own node, for privacy reasons and we can leave the mining to 0 threads.

Wallet Usage
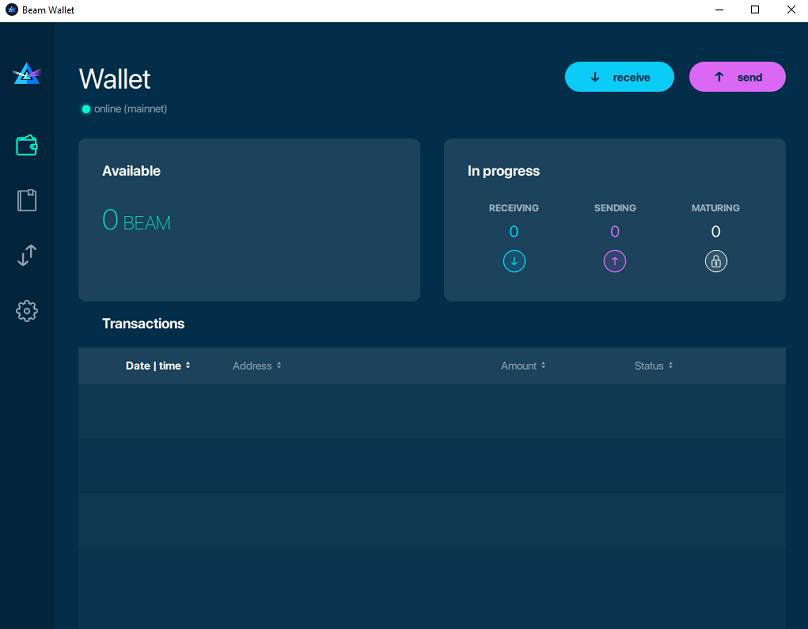
After the node is synced, we will reach the dashboard.
We can see the list of payment transaction at the bottom, and the available or spendable balance on the right, and on the left would be any in progress transactions.
The settings page allows us to see our wallets info, change it, and start any mining threads on the CPU.

The address tab is what we will focus on for mining. We can see that the wallet has one address or ID already created for me. By default addresses will expire in 24 hours from when they are created.

We will need to create another address that will never expire for mining. To do this we need to go to the main wallet tab and click on receive.

Now we need to set the expire on the wallet to never expire, and then click the close button.

We now should confirm the address is in our wallet, by clicking on the addresses tab. Here you can see the wallet we just created, and it is set to never expire.

Were not going to cover sending a transaction, since it is very similar to what were used to (setting fee and putting the senders address in the send box). A quick and easy read of most of what we just covered, plus sending a transaction can be found on their websites wallet instructions. You can also read about all the features in a more in depth walk through in their official wallet guide PDF.
Mining Pools
For this tutorial we will use https://beam.leafpool.com/ I have chosen this pool because we have used them in the past on mining articles and a low 0.5% fee.

Now that we have a pool, lets start mining!
CPU Mining
For CPU Mining we can download the official Beam wallet, and use the GUI miner. We will not focus on CPU mining since it is not profitable, compared to GPU mining.
GPU Mining – Nvidia
For Nvidia GPU mining we can use GMiner. The miner does have a 2% Dev fee. The miner is compatible with Windows and Linux.
Once downloaded, it is really simple to use.
Just create a new batch file (or script file if using Linux) inside the folder where the miner is and paste this into the batch file
miner --algo 150_5 --server mining_pool_server --port mining_pool_port --ssl 1 --user YOUR_ADDRESS.WORKER_NAME
Replace “mining_pool_server” with the server you want

Replace “port” with the port you want

Replace “wallet_public_key” with your wallet address. Make sure you use the permanent address on your Beam wallet, with it set to never expire.
“Worker” is optional. Use this if you have multiple mining computers. For example I could do address.officecomputer for one computer and then address.gamingcomputer for another computer.
This way you can keep track of them on the pools dashboard.
For example my setup is:
miner --algo 150_5 --server beam-us.leafpool.com --port 3333 --ssl 1 --user 328a60fc7588850be8183c0e30f5b2319d06650c06203e0a9ddb739c36f004dc
Double click the batch file to run the miner, and you should see something like this

The blue arrow indicates the temperature and speed for each GPU as well as the total speed.
The green arrow indicates the power usage for each GPU.
GPU Mining – AMD
For AMD there is lol miner. It has a 1.5% dev fee
lolMiner.exe --coin BEAM --pool mining_pool --port port --user wallet_public_key
Replace “mining_pool” with the server you want
Replace “port” with the port you want
Replace “wallet_public_key” with your wallet address. Make sure you use the permanent address on your Beam wallet, with it set to never expire.
“Worker” is optional. Use this if you have multiple mining computers. For example I could do address.officecomputer for one computer and then address.gamingcomputer for another computer.
This way you can keep track of them on the pools dashboard.
For example my setup is:
lolMiner.exe --coin BEAM --pool beam-us.leafpool.com --port 3333 --user d6c70b19ae3da1c0081798b52723e03beb06368c0944d3d1e3c592e248e7f4baa
Double click the batch file to run the miner, and you should see something like this

Note: This picture was taken from my article on How to Mine Aion (AION): Complete Beginner’s Guide
If there are problems, you can try a few things.
You may not have enough virtual memory. You may need 16GB of virtual memory (for Vega GPU’s you need more like 16GB per GPU) to change this go to Control Panel -> System and Security -> System and the click Advanced system settings on the left. From there, click settings under the advanced tab. Next click change, and then on the third screen, uncheck automatically manage, choose custom size, and type in the size (in MB) for both text boxes. Then press the set button, and then the ok button.

General Troubleshooting
One thing to monitor for is stale or rejected shares. If you see a lot of stale shares, you may want to try a server that is closer to you. If you see a lot of rejected shares, try to lower the intensity of the miner if available.
How much BEAM will I earn per day?
To figure this out, you would go to https://crypt0.zone/calculator/details/BEAM and use their calculator. The calculator does provide a rough estimate, so you may get paid a higher or lower amount than what the calculator actually says.

Most of the values are already correctly entered, and you only need to edit a few values.
Hash rate: Enter your total speed (in megahashes per second) for all of your mining computers. This would be the “total speed” value in your mining software. Make sure to add up all of the computers your using for Beam mining.
Power: Enter the total amount of power (in watts) that your mining rig is using. Some mining software will measure this for you. You can also measure total power consumption for your computer using special software, or a kilowatt meter. I prefer using a kilowatt meter, because I find it to be the most accurate. Make sure to add up all of the computers your using for Beam mining.
Electricity Cost: Enter the cost per kilowatt hour that you pay to your electricity company. I was able to find this info in my monthly bill, as well as on their website.
Pool fee: Enter the pool fee + the miner software dev fee. For Nvidia this would be 0.5 + 2 = 2.5% and for AMD it would be 0.5 + 1.5 = 2
Hardware cost: Enter in the total cost of all of your hardware.
In this image, we can quickly see how many coins and USD value we will make in certain time frames. You want to look at the Profit column, since this is the value after paying for your electricity usage. I usually just focus on the daily payout in USD. By just focusing on this number, you can run the calculator for a few different coins, and quickly see which coin is most profitable for your mining rig setup. Keep in mind you also want to weigh the daily payout with the market cap. A low market cap coin may be really profitable one day, and then could have half the payout tomorrow. For a new coin that has a lot of hype around it too, you also need to weight the hype factor and the inflation factor into your decision as well in terms of mining and selling immediately or mining and holding some.
That’s it. You should now be mining BEAM! Make sure to type in your public key into the mining pool’s dashboard, to keep track of your statistics.
Read More How to Mine Beam Coin (BEAM): Complete Beginner's Guide - Blockonomi : http://bit.ly/2RU2B2tBagikan Berita Ini


I have read a few of the articles on your website now, and I really like your style of blogging. I added it to my favorites blog site list and will be checking back soon. Please check out my site as well and let me know what you think.
ReplyDeleteOrder Innosilicon G32-500